A fast and effective product search is essential for a Magento e-commerce store to offer user-friendly shopping experiences and prevent visitors from bouncing off. The ability to easily find a needed product in a catalogue (which is typically large, featuring thousands of goods) helps users stay engaged, increases ATC (add-to-cart) rates, and converts visitors into paying customers.
Elasticsearch comes in handy here, as it allows Magento websites to enable fast and powerful product search and improve search relevance. Besides, Elasticsearch functionality doesn’t limit the scalability of your store, letting you expand without compromising the speed and effectiveness of the search engine.
In today’s post, we’ll cover how to install, configure, and optimize Elasticsearch for Magento 2, offering you a comprehensive guide with technical details and troubleshooting tips.
What Is Elasticsearch and Why Magento 2 Uses It
Elasticsearch is a powerful open-source search and analytics engine built on top of Apache Lucene. It’s designed to handle large volumes of data while delivering fast, accurate, and scalable search results.
Unlike traditional MySQL search in Magento 2, which relies on basic database queries, Elasticsearch is optimized for full-text search and advanced filtering. It can process complex queries, understand synonyms, and autocorrect typos, making it ideal for stores with thousands of products and high customer traffic.
Key benefits of Elasticsearch over MySQL search include:
Faster indexing and query performance.
Ability to scale for large catalogs and high traffic.
More relevant and accurate results for shoppers.
Advanced features like autocomplete, filtering, and synonyms.
Besides, Magento 2 natively integrates Elasticsearch as a default search engine, replacing the slower and less flexible MySQL search, allowing for easy setting and necessary customizations.
How Elasticsearch Improves Search in Magento 2
Let’s dig deeper into how Elasticsearch improves Magento 2 websites’ search in comparison to MySQL functionality.
Most of these options are easier to configure with our Elastic Search for Magento 2 plugin, which powers up out-of-the-box Elasticsearch, saves time on manual code manipulations, and allows you to handle search settings without extensive (and expensive) IT support.
Real-time results
Elasticsearch enables shoppers to get instant search results as they type, without waiting for full page reloads. This creates a smoother, faster shopping experience, giving people what they want within seconds, which, consequently, prevents bounce rate increase and provides better UX.
Autocomplete suggestions
Elasticsearch powers autocomplete, suggesting products, categories, or search terms as customers type in, helping them find what they need faster – just as the auto-suggest feature in Google.

Autocomplete suggestions make the customer journey simpler and easier, which results in higher CTR and increased customer loyalty.
Synonym handling
Elasticsearch recognizes related terms and synonyms (e.g., “PC” or “computer” or “laptop”), ensuring customers don’t miss products just because they typed in a different word.

Synonym recognition functionality helps improve sales across various segments of customers who are regionally or historically used to different word choices. For example, what’s called “autumn boots” in GB is “fall boots” in the US, so handling these two as synonyms is quite useful for your e-commerce success.
Relevance ranking and boosting
Elasticsearch scores and ranks results based on relevance, search history, and similar items searched. E-commerce site owners can also boost certain attributes, such as product names or best-selling items, so the most important products appear first.
Magento 2 Elasticsearch Requirements & Version Compatibility
It’s time to proceed to the technical part of the guide.
In order to successfully install and configure Magento 2 Elasticsearch, it’s necessary to make sure that your system meets the following technical requirements:
Server requirements
RAM: At least 2 GB dedicated to Elasticsearch (4 GB+ recommended for larger catalogs).
Java: Elasticsearch requires Java 8 or higher (for versions up to 7.x). From Elasticsearch 7.x, it bundles its own JDK.
Operating system: Works on Linux, macOS, and Windows, but Linux is recommended for production due to performance and stability.
Magento version compatibility
Magento 2.3.x: Elasticsearch was optional (you could still use MySQL search, but Elasticsearch was recommended).
Magento 2.4+: Elasticsearch became mandatory — MySQL search was completely removed.
Supported Elasticsearch versions
Magento 2.3.x: Compatible with Elasticsearch 5.x, 6.x, and partially 7.x.
Magento 2.4.x+: Requires Elasticsearch 7.x. Elasticsearch 8.x is not officially supported by Adobe Commerce/Magento Open Source without plugins. If you want to run Elasticsearch on Magento 2.4.x+, consider using Elastic Search for Magento 2 plugin.
How to Install Elasticsearch for Magento 2 – Step-by-Step Installation Process
Magento 2 Elasticsearch installation process may seem complex for a non-technical user, so you can choose to ask for our dev team assistance, either in-house or outsourced. Still, let’s review the key steps and the relevant CLI commands if you decide to handle the process yourself.
Note: All the commands below are run in the server console, usually by connecting via SSH to the machine where your Magento 2 store is installed. Log in to the console with your credentials (managed hosting providers like Cloudways, Nexcess, AWS, and DigitalOcean give you an SSH login, which consists of a username and a password). Once logged in, you’ll see a black screen where you can type these commands.
1. Update system packages
Updating system packages makes sure your server’s package list and installed software are up-to-date, as well as prevents future installation errors. Neglecting this step may lead to installing an outdated or broken dependency.
Command:
sudo apt update && sudo apt upgrade -y
Output example:
Hit:1 http://archive.ubuntu.com/ubuntu focal InRelease

Fetched 3,241 kB in 2s (1,640 kB/s)

Reading package lists... Done
2. Install Java (required by Elasticsearch)
Elasticsearch is written in Java, so it cannot run without Java. Eventually, you’ll need to install it and check the version (it should be higher than Java 8).
Command:
sudo apt install openjdk-11-jdk -y

Check Java version:

java -version
Output example:
openjdk version "11.0.24" 2025-01-14

OpenJDK Runtime Environment (build 11.0.24+8-Ubuntu-0ubuntu3)

OpenJDK 64-Bit Server VM (build 11.0.24+8-Ubuntu-0ubuntu3, mixed mode)
3. Add Elasticsearch GPG key and repository
Elasticsearch GPG key and repository show your server where to download Elasticsearch from, and communicate that the installation package is safe and comes from the official source.
Command:
wget -qO - https://artifacts.elastic.co/GPG-KEY-elasticsearch | sudo apt-key add -

sudo sh -c 'echo "deb https://artifacts.elastic.co/packages/7.x/apt stable main" >
 /etc/apt/sources.list.d/elastic-7.x.list'
4. Install Elasticsearch
Tell your server to actually install Elasticsearch for Magento 2. After this step, you will be able to see Elasticsearch files in /usr/share/elasticsearch/, and its configs in /etc/elasticsearch/.
Command:
sudo apt update

sudo apt install elasticsearch -y
Output example:
Setting up elasticsearch (7.17.24) ...

Created symlink /etc/systemd/system/multi-user.target.wants/elasticsearch.service →
 /lib/systemd/system/elasticsearch.service.
5. Enable and start the service
To start Elasticsearch, you can use enable and start commands. The enable command makes sure Elasticsearch auto-starts after a server reboot, while the start command runs Elasticsearch immediately.
Command:
sudo systemctl enable elasticsearch

sudo systemctl start elasticsearch
After you have launched the engine, check its status to see if Elasticsearch is active.
Check status:
sudo systemctl status elasticsearch
Output example:
● elasticsearch.service - Elasticsearch

     Loaded: loaded (/lib/systemd/system/elasticsearch.service; enabled;
   vendor preset: enabled)

     Active: active (running) since Mon 2025-08-18 11:07:12 UTC; 5s ago

   Main PID: 14329 (java)

      Tasks: 77 (limit: 9451)

     Memory: 1.6G

     CGroup: /system.slice/elasticsearch.service

             └─14329 /usr/share/elasticsearch/jdk/bin/java ...
6. Verify installation
This step helps you check if Elasticsearch actually responds to requests in Magento 2. If you type the command below and see the "tagline" : "You Know, for Search" line in JSON, then everything goes according to the plan.
Command:
curl -X GET "http://localhost:9200/"
Output example:
{

  "name" : "ubuntu-server",

  "cluster_name" : "elasticsearch",

  "cluster_uuid" : "9sDf2kZ8Q2-xy78cZ",

  "version" : {

    "number" : "7.17.24",

    "lucene_version" : "8.11.1"

  },

  "tagline" : "You Know, for Search"

}
Magento 2 Elasticsearch Configuration via Magento Admin Panel
Once the installation is complete, you need to configure Elasticsearch via your Magento 2 admin panel, so your store search uses Elasticsearch instead of MySQL.
Note: Before this step, we recommend that you install Elastic Search for Magento 2 plugin. It simplifies Elasticsearch configuration by pulling many important settings from code right to the Magento admin interface, allowing you to power up search without spending time on code modifications.
Enable Elasticsearch
Open Stores > Configuration > Catalog > Catalog Search.
In Search Engine, pick the Elasticsearch version supported by your setup.

Click Save Config.In the Elasticsearch block below, fill in the connection details (Server Timeout, Hostname, Server Port, etc).
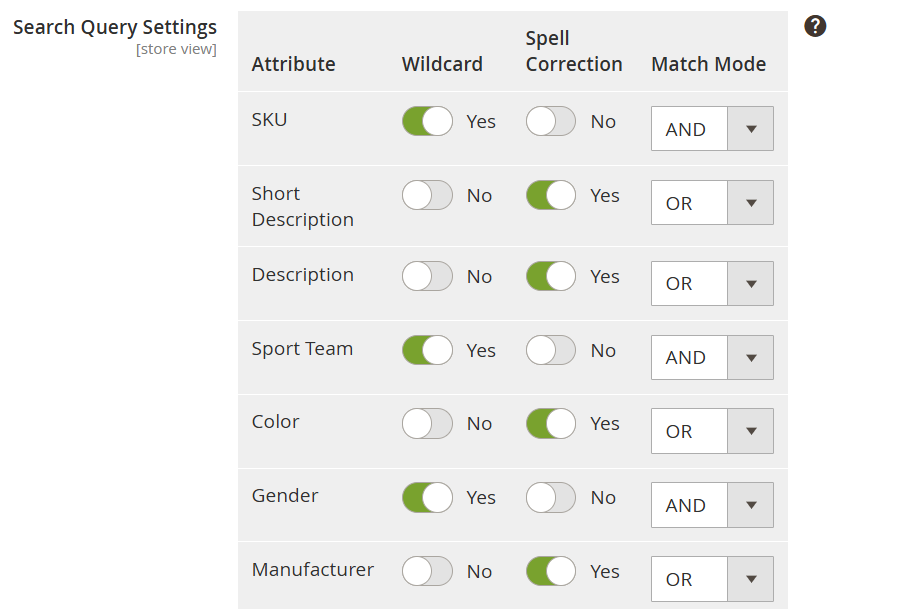
Using a Magento 2 Elasticsearch query allows you to directly control how product and catalog data are retrieved and displayed to the user, providing more accurate and relevant search results. Elasticsearch index prefix Magento 2 option means that you need to enter an Elasticsearch index prefix. If you use one Elasticsearch instance for more than one Magento installation, specify a unique prefix for each installation. If not, use the default magento2 prefix.

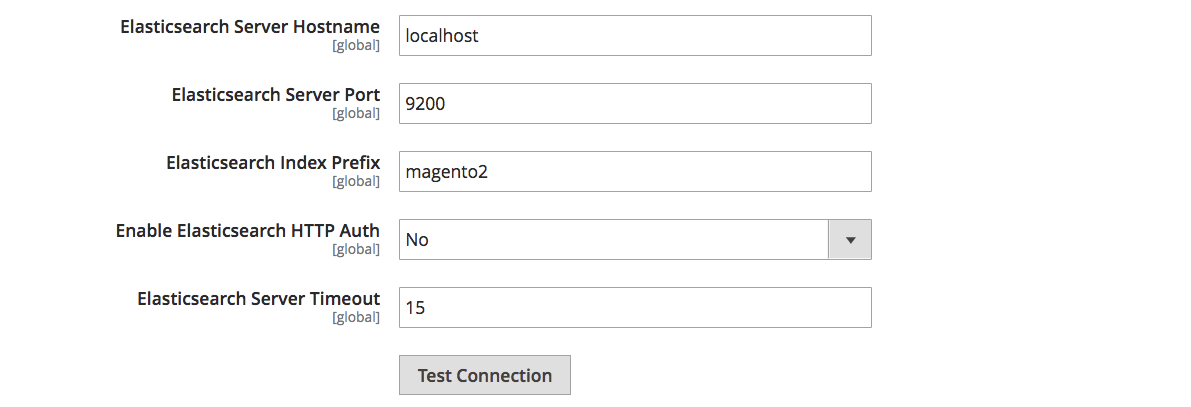
Test and validate Elasticsearch connection
After you have specified the connection details in Stores > Configuration > Catalog > Catalog Search, click the Test Connection button. If successful, Magento will display a confirmation message.
Alternatively, you can test your Magento 2 Elasticsearch connection directly from the server via the CLI test command:
Command:
curl -X GET "http://localhost:9200/"
Output example:
{
"name" : "m2-server",
"cluster_name" : "elasticsearch",
"version" : {
"number" : "7.17.24"
},
"tagline" : "You Know, for Search"
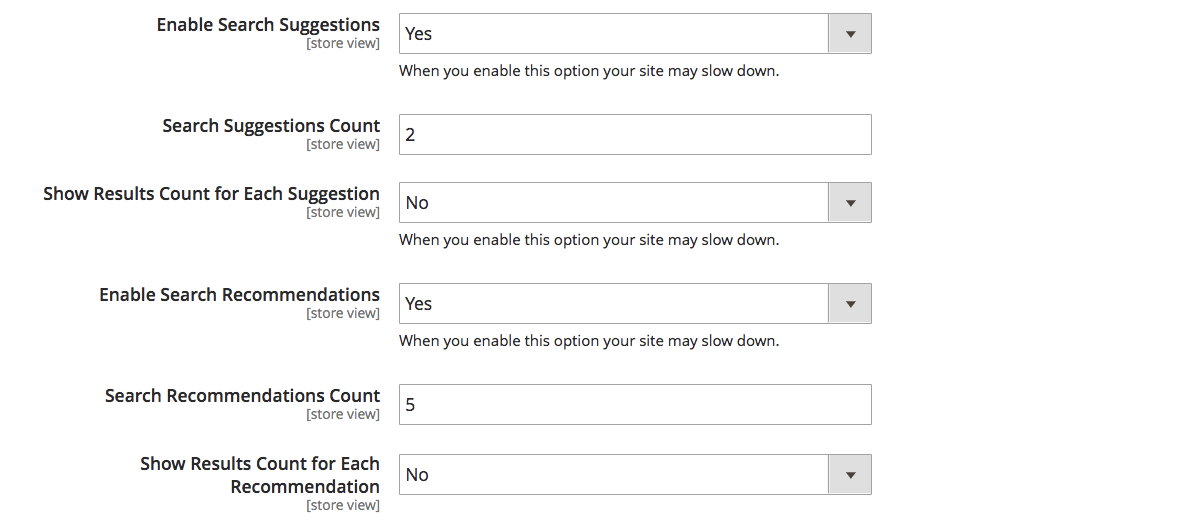
}Configure search suggestions
- In Stores > Configuration > Catalog > Catalog Search, specify the search suggestions.
In the Search Suggestions Count, specify how many search suggestions you want to display. In the Show Results for Each Suggestion field, you can set up whether you want to display the total number of search results. Enable Search Recommendations, then enter the Search Recommendation Count, and set if you want to Show Results Count for Each Recommendation.Save the changes to finish the Magento 2 Elasticsearch setup process.
After this, you can configure Elasticsearch search terms for your Magento 2 store, for example, misspelled words and synonyms. To learn how to do this, check out the official guide.
Key options explained
While some of Magento 2 Elasticsearch options are quite clear from their names, let’s describe them in more detail.
Server hostname and port
Elasticsearch Server Hostname defines where Elasticsearch is hosted and runs. It can be localhost if Elasticsearch is installed on the same server as Magento, or a dedicated server IP if Elasticsearch is on a different server.
Elasticsearch Server Port defines the port number that Magento sends search requests to. The default port for Elasticsearch is 9200. Still, if you have custom configurations, Elasticsearch might use a different port.
Index prefix
Elasticsearch Index Prefix is a unique identifier that is assigned to a Magento store or catalog. This helps Elasticsearch correctly arrange and process search queries that come from a store (like an organized database table). Index prefix ensures unique names for the indexes, especially if you run multiple Magento stores using the same Elasticsearch server.
If you run one store, a prefix could be magento2 (as in the example table). If you have several Magento stores using the same Elasticsearch server, you can go with magento2_pizza, magento2_pasta, etc., depending on store names, goods types sold, or any other comfortable option.
Without index prefixes set, all stores might conflict with each other because of the same index names.
Enable suggestions and spell correction
Enable Search Suggestions improves user experience as users get instant results as they type. For example, if they want to look for “leather shoes”, they can only type "shoe" and still get relevant search results. This feature speeds up the search process, helping people find products faster.
You can go further in this setting with Elastic Search for Magento 2 plugin and specify a number of symbols to display suggestions after. To do this, find the Enable Wildcard After* option in Catalog settings:

*Wildcard is the name for the Search Suggestions feature used in the Elastic Search for Magento 2 plugin.
Spell correction allows Elasticsearch to display relevant products even if a user mistypes or makes a spelling mistake. You can specify the number of symbols to apply correction after in a corresponding field:

Note: Search suggestions (Wildcard) and spell correction do not work at the same time. Make sure you configure settings correctly to avoid system conflicts.
Reindexing Magento 2 with Elasticsearch
Reindexing Magento 2 with Elasticsearch is necessary to keep the whole system on the same page about product and catalog data. Reindexing is necessary every time:
Products are added, updated, or deleted.
Price rules change.
Category structure is updated.
In Magento 2, the reindexing process is a default option that doesn’t require any manual CLI manipulations or condition settings; all you need is to specify the saving mode.
Update On Save mode automatically pushes reindexing whenever you save changes for products, prices, categories, etc., so Elasticsearch data remains relevant all the time.
Update On Schedule mode allows you to schedule store reindexing as often as you need, so the system will be updated with cron jobs once in a selected time period.
Optimizing Magento 2 Elasticsearch Settings for Performance
In order to make Magento 2 Elasticsearch do its best for your store, you can optimize some search engine settings based on your e-commerce store's specific characteristics and industry best practices.
Indexing interval best practices
For small to medium stores, run reindexing in the Update on Save mode, as the system load will not be heavy and able to affect performance due to a smaller number of items to index.
For large catalogs, use Update by Schedule with cron jobs to avoid heavy load during users’ peak hours. This will help keep the store operating smoothly and prevent system delays.
Shards and replicas
Shards are portions into which your Elasticsearch data is divided to distribute the load.
Replicas are copies of your primary shards that help prevent performance failures – if a server is down, a replica can still serve data.
By default, Magento 2 goes with 1 shard (i.e., data flow) and 1 replica (data flow backup).
While this is enough for small stores, larger ones with 200,000+ products and/or heavy traffic may require adding more shards and replicas to reduce system load, increase fault tolerance, and improve search performance.
Example. Imagine you have a big Magento e-commerce store with 500,000 products and high traffic loads.
The default setup of 1 shard and 1 replica, which would work for a small shop, is insufficient to handle your data streams. Instead, you can go with 3 shards and 2 replicas, so Elasticsearch can split the load when performing searches and have 2 backup copies of your data to carry on in case a server fails.
Filters, synonyms, and search weighting
Note: Stop words and synonyms can only be managed via the Magento admin panel with the help of the Elastic Search for Magento 2 plugin. If you don’t use the plugin, these settings need to be done manually in the Magento code.
Adding synonyms (e.g., jacket = coat) helps improve product discoverability, while specifying stop words (common words to ignore, like the, a, and) allows to achieve for cleaner search results.
To manage synonyms, in your admin panel, navigate to System > Manage Synonyms.

Stop words are managed through System > Manage Stop Words:

Adjusting attribute weighting is important to make product names or SKUs rank higher than product descriptions, so Elasticsearch will first look for the terms in the query in product names. This will help your site visitors get more relevant and clean results.
Troubleshooting Magento 2 Elasticsearch Issues
Magento 2 Elasticsearch configuration may have several issues that interrupt smooth functioning. Here are the most common ones and how to fix them.
Connection refused
If the connection is refused, then Magento cannot connect to Elasticsearch, and the search engine will not be running. This may happen because the wrong hostname and/or port are set in Magento.
How to fix:
- Check connection status and run Elasticsearch via CLI commands:
sudo systemctl status elasticsearch
sudo systemctl start elasticsearch
- Then, verify the connection in Stores > Configuration > Catalog > Catalog Search. Pay attention to the hostname and port settings.
Invalid credentials
If security is enabled, Magento may not be able to authenticate with Elasticsearch because of wrong credentials.
How to fix:
- Check elasticsearch.yml for user/password settings.
- Then, update Magento configuration with correct Elasticsearch credentials:
bin/magento config:set catalog/search/elasticsearch_username <username>

bin/magento config:set catalog/search/elasticsearch_password <password>
“No alive nodes” error
If Magento fails to fetch active Elasticsearch nodes, it will state that no alive nodes were found. This may happen because of incorrect port settings or cluster problems.
How to fix:
Verify Elasticsearch is listening on the correct port:
curl -X GET "http://localhost:9200/"
Check if the cluster is healthy:
curl -X GET "http://localhost:9200/_cluster/health?pretty"
Conclusion
Elasticsearch for Magento 2 allows you to fine-tune catalog search and improve your website UX for optimized customer journeys, better engagement, and, consequently, improved retention, loyalty, and profits.
We hope this guide helped you to understand the details of how to install, configure, test, and optimize Elasticsearch for Magento 2. In case it didn’t, contact Amasty specialists for professional Magento 2 Elasticsearch installation assistance.
Frequently Asked Questions
Elasticsearch is the default search engine in Magento 2. It improves product search speed, accuracy, and relevance by providing advanced features such as autocomplete, real-time results, and synonym handling, which are not possible with MySQL search.
Go to Stores > Configuration > Catalog > Catalog Search in the Magento Admin. In the Search Engine dropdown, select Elasticsearch (the version supported by your setup), then save the configuration.
You can check if Elasticsearch is running by:
Command line: running curl -XGET 'http://localhost:9200' (adjust the host and port if needed).
Magento admin: navigating to Stores > Configuration > Catalog > Catalog Search and testing the connection.
Elasticsearch configuration can be found in Stores > Configuration > Catalog > Catalog Search. From here, you can set the host, port, index prefix, and other options. For deeper settings, you’ll need to edit the elasticsearch.yml file on your server.