Magento extension development is a complex, multi-component process that allows you to extend the out-of-the-box functionality of Magento 2 and boost your e-commerce website performance with necessary features. That said, knowing how to create module in Magento 2 can help you freely add some missing but important functions without losing time and money. Or, if you’re not a store owner but an agency, offer your clients the necessary tools for their businesses and earn a good name and reputation.
Today, we’ll navigate you through the process of Magento extension development, covering all stages from marketing assessment to acceptance criteria. And, sure thing, share some expertise on how we create custom modules in Magento 2 at Amasty.
Preparation: Marketing Assessment of the new Magento 2 Extension
Before actually discussing how to create a custom module in Magento 2, we should start with the marketing assessment. This step helps find out the demand for the new module (if you’re going to sell it to clients) or better understand your pain points and how to solve them effectively with the new extension (if you’re planning to use the new Magento 2 module in-house).
Amasty has existed on the market since 2009, we’ve become the first premier extensions builder, certified our development processes, and issued 300+ solutions that help 100,000+ clients so far. And today, we’d like to share our expertise with you.
Extension development process at Amasty
It all starts in the marketing and product management teams. Our marketing specialists, together with product managers, conduct market research and find the pain points our target audience is experiencing at the moment.
In case we don’t have a ready-made solution that covers the emerging requirements, it comes to the question of the development of a new extension.
- At first, we analyze the market, current trends, and increasingly popular tools in the area of e-commerce. Then we dive deeper into the Magento community needs and analyze the development path of Adobe. At this stage, we form the idea of a new product. We gather feature requests from our clients and partners and pass them to the product team… Based on customer needs and e-commerce business challenges, product owners define a set of features to include in a product to create the best market fit.
- Product marketing conducts a must-have part of the market analysis and user needs before the extension development. At this stage, we collect user pains and requirements, evaluate them to understand the priority of the new features. Based on the generated patterns, we design the approach to the product UX. It is this initial analysis that allows us to develop the extension the end-user is waiting for.
Product managers involve business analysts to maintain a competitive analysis of the new extension and gather the requirements that will later be included in a product. BAs also conduct customer development research. We speak to our clients and partners interested in enhancing their Magento functionality, and the result clearly shows the ways to make our products better. BA is a vital link between the end-user and the product team. Our big part is to understand what the end-user’s business lacks right now for better efficiency, what problems it comes across, fully analyze the request and translate it to the language the product team speak at and make sure the realization of the solution is the most effective.
Once they are done, product managers and business analysts meet together with marketing specialists to further discuss the new product vision and requirements. The agenda includes high-level product specification, technical benchmarking, use cases, key features, estimation and understanding of what development team (catalog, backend, checkout, shipping, frontend, etc.) can take it into work.
Then the product gets into the roadmap.
Having reached a consensus on the question, a responsible product manager gathers the information into a project and presents it to the stakeholders.
Given the fact that the project is approved, the product manager discusses the architecture of the extension, resources and project timing with the technical lead of the development team that will write the future extension.
We set up a cross-team meeting where technical leads from different teams discuss the architecture of the future module, its basic functionality, and the logic of the work. As a result, the leads create a diagram of classes and database (if required).
Later their investigation goes to the development team where the team technical lead together with developers start to decompose the task with the view to eliminate potential risks.
After the decomposed tasks are passed to the refinement meeting where the team estimates them based on the volume, risks, and complexity.
Tech leads design the architecture of a new product taking up programming challenges, code review with a view to detect possible vulnerabilities, the module performance, and potential bugs.
After the technical evaluation, the product manager arranges a meeting with the project manager. When the product manager creates a product backlog he involves the scrum master and presents the vision of a new product and scope of tasks to the development team. Also, we monitor the progress of work and how we move towards the goal on daily meetings.
The biggest thing in any teamwork, whether it’s software development or baking cakes, is the synergy of all actors in the process. When people understand their part of the project and how they’re involved in the common cause, they contribute daily making both the released modules and the work better.
Our design team creates a prototype of the new extension even before it goes to development. We’re doing this to eliminate possible problems that can influence the product UX and reduce the development time at an early stage.
Quality assurance specialists are part of a new development project from the very beginning; they participate in refinement and planning sessions. As soon as specific features of a new module are written using split branches in git, the functionality of each of them can be tested independently as required. Also, if needed the different functionalities are merged. When all the features are written, our QA department conducts regression testing to make sure all the features work as needed without adversely affecting the work of others.
On the testing stage of a project, we check the quality of our products and their conformity with the release criteria. This includes both functional and non-functional testing conducted by our manual QA specialists and QA automation engineers.
When the product is tested and ready for ‘vending’, our marketing specialists together with the design team continue working on the presentation to release it to the market. We work out the product offering, user guide, and demo for our website, based on use cases and client’s requests.
Once done, we inform interested clients and partners about the release and provide the information to the public. We constantly analyze clients’ and partners’ feedback to enhance the product and share the positive experience within the community.
Once the product is online, our support team assists in any case, whether it’s a presale question about module features or technical help with further customization of the extension. They analyze customers’ demands and update the product documentation in the website's FAQ section and video guides.
We gather first feedback from our clients who’ve bought a new extension and supply our product teams with useful information from the end-users.
Preparation 2. Setting an Epic to Develop Magento 2 Extension
Once the marketing assessment of module demand is completed, the development of a new Magento 2 extension goes to the product owner who creates an epic.
Given created, the epic is split by our business analysts into user stories to further inspect each of them separately.
Ultimately, we receive the following outline:
the main functionality and business logic of the new extension including diagrams in BPMN and/or IDEF notations;
a list of features for the MVP (minimum viable product);
a list of features for the MMP (minimal marketable product).
Then the epic is passed to the technical lead of a responsible development team who will reason out solutions to the architecture. The technical lead conducts a risk assessment study for each of the given options to weigh their strengths and limitations.
After that, the epic hits the architecture meeting attended by all development teams’ technical leads. The objective of the meeting is to draft the best possible architecture solution for the new product. The attendees discuss the options offered by the development team technical leads, find the vulnerabilities and solutions to make the module extendable with new features, secure and well-supported.
Given the architecture adopted by the team, the epic gets onto the team board where is further decomposed into simpler tasks under the guidance of the tech lead during the refinement session. Thereafter, the task is taken into development.
Preparation 3. Defining Important Components of the Magento 2 Extension Development
We figure out the testing strategy during the refinement meeting to prevent bugs at the last stages of the development. The strategy includes all types of automated tests, functional and non-functional testing like security and performance check.
According to our in-house standards, we cover all the new extensions with unit tests, MFTF tests, and integration tests. Thus, we have one testing logic for all extensions that allows us to make sure the developed product is ready to use.
We resort to cross-team code review during which all team members review each other’s code. This allows us to ensure the code quality and increase the employees' competencies.
We use PHP_CodeSniffer of the latest version to make sure our code fully complies with the latest Magento standards. Moreover, we’ve set the strictest level of bug severity detection, equal to 1, which indicates we follow the most stringent requirements for the quality of the code we write.
Beyond that, we run the code through PHPStan which lets us reduce to a minimum any code typos.
Also, we launch Magento 2 installation together with the extension to verify the vanilla features of the platform weren’t affected by the changes we’ve introduced.
Preparation 4. Setting Acceptance Criteria for the Released Magento 2 Extension
We take care of the high quality of our products and check them for compliance with our in-house technical and business requirements. Our standards include the examination of the extension’s functionality, stability, and compatibility.
Our technical specialists double-check that our extensions are secure and not vulnerable to any known online attacks. All our extensions support GraphQL. We take care of the UI/UX testing and do the utmost to release the extensions bug-free.
Here at Amasty, we pay particular attention to the Magento 2 extension compatibility to make sure it won’t cause any conflicts with Amasty_Base and all the related extensions with dependent functionality, as well as the latest Magento 2 versions.
Step 1. Define What Magento Extension You Create
To demonstrate how to create a custom module in Magento 2, we are going to create a new HelloWorld module, which is going to have some basic functionality, covering as many development aspects as possible in this case.
This Magento 2 extension is going to have a model with undefined data, which will be stored in the database. And we’ll display the values on the product page.
What’s more, we are going to create several settings to change the extension’s behavior. Nothing complicated, so let’s start.
Development processes are a given in every IT business conversation. Their optimization is the never-ending struggle for any company willing to shorten the time from ideation to the release of an end product.
Step 2. Create configuration for the Magento 2 Extension
The first step is to install Magento 2 and create a catalog to store the extension files. In Magento 2 files are not distributed through the folders and have a modular structure.
The files of the newly created extension will be in this catalog:
app\code\Amasty\HelloWorld/
Here, Amasty is the name of the company that built the extension, HelloWorld is the name of the Magento 2 extension we are creating at the moment.
Now it’s time to actually code the extension. Catalogs' purposes have slightly changed in comparison with the first versions of Magento.
Extension configuration is located in the etc folder, as before.
Let’s create app\code\Amasty\ HelloWorld \etc catalog in Magento 2 and add a module.xml file inside it. This is the file where we are going to set our extension name and its version.
The file looks like this:
Now let’s check if Magento 2 sees the extension.
Run the following console command:
php bin/magento setup:upgrade
But there’s no result. To fix it, let’s create registration.php file in the root folder of the extension and put the following code inside:
This is done to tell Magento 2 that it should run the extension from the current directory.
Now go and clear Magento cache, and you’ll see that our extension is working now:

Step 3. Create Settings for your Magento 2 Extension
Now let’s create some settings for the new extension. To do that, add adminhtml catalog to etc catalog. It will contain configuration files for backend.
The first file we need here is routes.xml for frontName and id setting, which is used to define queries for the extension. It is done by the following piece of code:
Now let’s configure the extension settings. As in the previous version, they’re located in the system.xml file, but the xml markup is slightly different in Magento 2.
I’m creating the three most popular settings as an example: a text setting, yes/no setting and a setting with custom values.
Have a look at the config file contents and what it actually means:
Add a new section to the settings block using <tab>. Set the unique ID and the name of the settings section inside. It is done because we have a very high possibility of using several apps from the same vendor on a single site.
Add the new <section id="amasty_helloworld"> , again, with the unique ID, and set the necessary parameters, such as type, translation fields, order, label, the block for which the section is added, and so on. And then add the settings just inside the section. They will be divided into groups (one group in our case). The groups are defined by <group>, and the fields are set by <field>. We have already created three settings and pointed out types, labels, visibility, translation, comments and the data model.
In our case the third setting implies custom data, so we pointed out a separate data model for it. To do that, you need to create Amasty\HelloWorld\Model\Source\ Align model, where we will set the needed choice variants. The extension should be defined from \Magento\Framework\Option\ArrayInterface interface, and you need to redefine toOptionArray() and toArray() methods as well.
Let’s check the result. Open your Magento 2 backend, go to Stores - Configuration. Boom, we can see the settings!
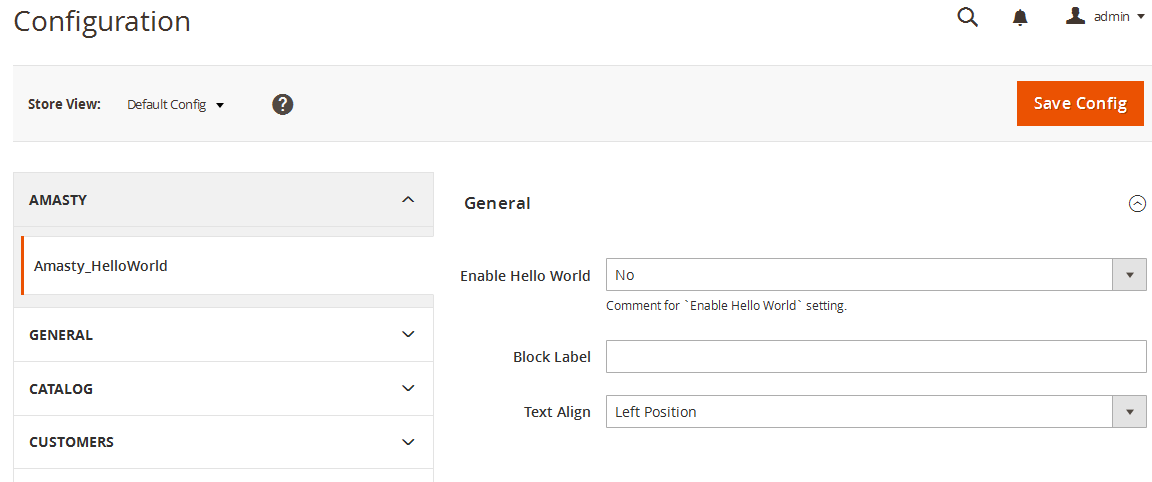
Now, as we created the settings, we should set default values for the options. To do that, create a config.xml in the etc catalog and put the default values in accordance with system.xml in there.
→ If you need help to configure the Amasty module according to your needs, check out our Configuration Service. You will be provided professional Magento web configuration service for any available extension. After the configuration of the module, testing is carried out for its correct operation.
Step 4. Frontend output
Block
Now let’s try to show something on the frontend, i.e. to create a block and a template for it, and then to show this block on the product page.
Create a class of \Amasty\HelloWorld\Block\Catalog\Product\HelloWorld block, which should inherit from Magento class \Magento\Framework\View\Element\Template
We are going to use the parent constructor. Here’s how it will look like for this block:
Template
Let’s create a simple template and put it in the following catalog:
Amasty\HelloWorld\view\frontend\templates\product\hello.phtml
You can see that in Magento 2 we have the view catalog, where we’re going to store the information, which was scattered in several theme catalogs, such as templates, layouts, scripts, styles, before.
Put this simple text inside:
<?=__('Hello World');?>As we see from the example, now you can perform translation in Magento using __() without a separate class. And the translation for this line will be pulled from Amasty\HelloWorld\i18n\en_US.csv
We have created the template, now let’s show it on the product page.
Layout
Time to create the layout! Now we are creating not a unique layout for all the pages, but a separate file for each page. As we will show the block on the product page, let’s create a layout with the following name:
Amasty\HelloWorld\view\frontend\layout\catalog_product_view.xml
Put this code inside:
As an example, we added the new block into product.info.main block in the layout code and added the styles file to use when showing on frontend. The styles file has the following address:
Amasty\HelloWorld\view\frontend\web\css\hello.css
Refresh the product page:
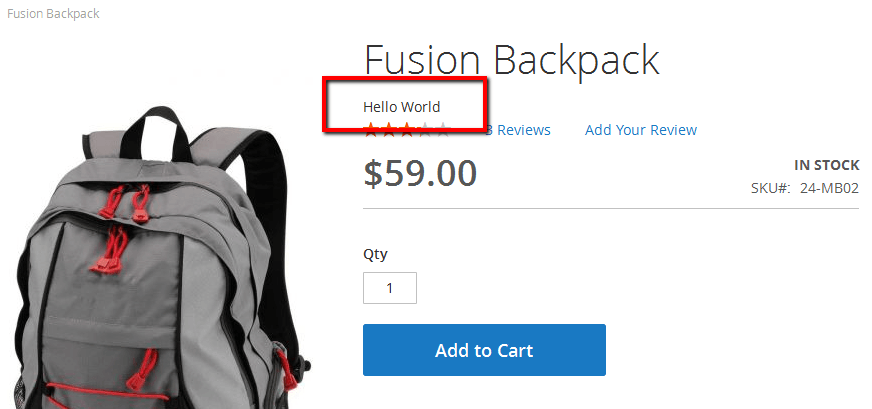
Voila, the block is there!
Now let’s change the look of the block – and add the helper initialization to it.
The extension constructor looks like this:
The helper from the created block is used as $this->_helper variable.
Helper
Create the helper in the following catalog:
Amasty\HelloWorld\Helper\Data.php
Add \Magento\Framework\App\Config\ScopeConfigInterface interface object initialization to the helper, it works to receive the data from configuration.
Now the file looks like this:
In this piece of code you can see that three functions for getting extension configuration from settings section were created.
Let’s use these functions in the block and change the template:
Now the block is displayed taking the settings into account:
Step 5. Magento 2 Plugin Model Creation
Create installation script
As in the 1.x versions of Magento, you need to create the installation file to use your own table. We are going to describe creating of a simple table with several fields. The file should be created here: Amasty\HelloWorld\Setup\InstallSchema.php
And this is its contents:
You can see that we are creating an 'amasty_helloworld' table with one field of integer type and two fields of text type.
Model creation
As in the previous Magento version, we need to create three classes to work with the model: the model itself, the resource model and the collection.
Let’s create a Amasty\HelloWorld\Model\HelloWorld.php file and use the following initialization:
[php]
/**
* Copyright © 2015 Amasty. All rights reserved.
*/

namespace Amasty\HelloWorld\Model\ResourceModel;

class HelloWorld extends \Magento\Framework\Model\ResourceModel\Db\AbstractDb
{
/**
* Model Initialization
*
* @return void
*/
protected function _construct()
{
$this->_init('amasty_helloworld', 'id');
}
}

[/php]
We just set the Magento helper constructor for the model here. In fact, there is no great difference from the first Magento versions on this step. The resource model and the collection are stored in the following catalogs:
Amasty\HelloWorld\Model\ResourceModel\HelloWorld.php

Amasty\HelloWorld\Model\ResourceModel\HelloWorld\Collection.php
These files’ listings are of no particular interest. Create a simple function in the block we’re working with:
[php]
public function getCollection()
{
$model = $this->_objectManager->create('Amasty\HelloWorld\Model\HelloWorld');
$collection = $model->getCollection();

return $collection;
}

[/php]
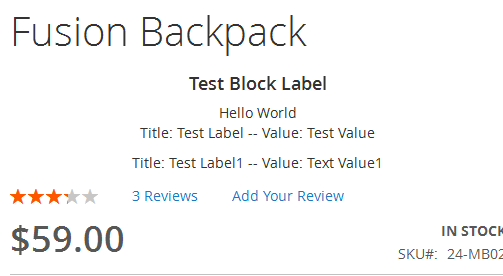
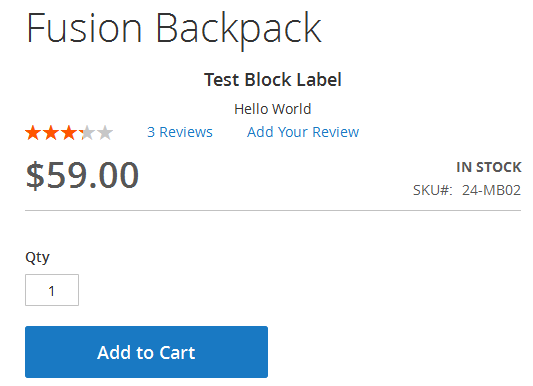
and display it inside the template:
[php]
<?php foreach($this->getCollection() as $item):?>

<label><?= __("Title: ") . $item->getLabel()?></label> -- <label><?= __("Value: ") . $item->getValue();?></label>

<?php endforeach;?>

[/php]
Now update the product page: it works!